SharePoint 2013 HTML Masterpage and UpdatePanel

Its very good news for SharePoint developers, in SharePoint 2013 they don’t need to write code or register AJAX Control Toolkit for using asp.net Ajax toolkit script manager. SharePoint while converting HTML master page to SharePoint master page insert the asp.scriptmanager to .html and .aspx master page.

I was working on a Visual web part and using UpdatePanel for executing some events asynchronously. It was noticed the UpdatePanel is not working. After spending long time and searching for the issue. We noticed a component “SPWebPartManager” inserted by SharePoint design manager into HTML file
<header> tag.


<!--MS:<SharePoint:AjaxDelta id="DeltaSPWebPartManager" runat="server">-->
<!--MS:<WebPartPages:SPWebPartManager runat="server">-->
<!--ME:</WebPartPages:SPWebPartManager>-->
<!--ME:</SharePoint:AjaxDelta>-->

The solution is, the above code snippet should be moved to the very first tag line under <body>.

After saving the UpdatePanel is working fine. I hope it will be helpful for you. 🙂

SharePoint Office 365

Manage sharing with external users in SharePoint Office 365

if you are running a SharePoint Office 365 portal and want to share contents on team site (including documents and sites) with external or outside of your organization users like Hotmail, live, Outlook.com or other Microsoft Services.

To give external users access, you need to go to your office 365 administration, and set your site collection Sharing Properties.

In this exercise we will share access to the site to external users.

Image

Select second or third option to enable sharing as given below.

Sharing2

 Now, the sharing has been enabled and you can share content to external users. For this, open your portal and click on Image Share button and enter users as give below.

Image

After sharing, users will get an invitation email and will be able to logon to your portal.

Withdraw invitations
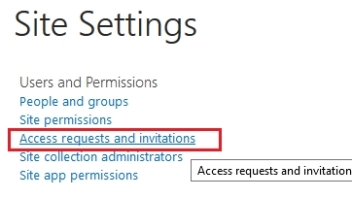
If you want to withdraw an invitation you have sent to an external user, you can do this before it is accepted by user. For this you need to the Site settings and then click on Access requests and invitations.Image

If the external user has already accepted an invitation, and you want to remove their access, you can do so by removing them from the SharePoint permissions group to which you assigned them.

SharePoint 2010 master page compatibility issues in Internet Explorer

Recently I’ve encountered some issues at client sites that all led back to SharePoint / Internet Explorer compatibility problems. In SharePoint, we was added some CSS3 styles/tags functionality to web parts. It was rendering fine in FireFox and Chrome, but in IE it’s rendering behavior was different. To fix browser incompatibility problems, I founded the exact issue in SharePoint 2010 master page.

Before going in deep in SP master page. I want to describe IE rendering and compatibility modes first.

Internet Explorer has a Compatibility View (or mode) that affects how some websites are displayed. In recent versions, Windows Internet Explorer has dramatically improved support for established and emerging industry standards, such as HTML5, Cascading Style Sheets, Level 3 (CSS3), and Scalable Vector Graphics (SVG). By default, Internet Explorer properly displays webpages designed to support these standards. Because some of these standards are still evolving, older websites may not fully support them. In addition, later versions of certain standards specify different behaviors than earlier versions of the same standard.

As a result, websites designed to support the earlier versions of these standards may display differently when viewed with web browsers designed to support current versions of the standards, such as Internet Explorer. In order to help such websites display correctly, Internet Explorer supports a display mode called Compatibility View, which displays webpages as if they were viewed by an earlier version of the browser.

X-UA-Compatible Meta Tag

The X-UA-Compatible meta tag allows web authors to choose what version of Internet Explorer the page should be rendered as. The designer can easily control what browser version a page will render in with simple meta tags. This gives the designer easy access to exactly how Internet Explorer will render the page.

Content Value

Details

 IE=5 <meta http-equiv=”X-UA-Compatible” content=”IE=5″ />
This forces IE 8 to render the page in “Quirks” mode.
 IE=7  <meta http-equiv=”X-UA-Compatible” content=”IE=7″ />
This forces IE 8 to render the page using IE 7 Strict mode.
 IE=EmulateIE7 <meta http-equiv=”X-UA-Compatible” content=”IE=EmulateIE7″ />
This forces IE 8 to use the !DOCTYPE declaration in the page to determine the rendering mode.
 IE=8 <meta http-equiv=”X-UA-Compatible” content=”IE=8″ />
This forces IE 8 to display the page in Internet Explorer Standards mode.
 IE=EmulateIE8 <meta http-equiv=”X-UA-Compatible” content=”IE=EmulateIE8″ />
This forces IE 8 to use the !DOCTYPE declaration in the page to determine the rendering mode.
 IE=edge <meta http-equiv=”X-UA-Compatible” content=”edge” />
This forces Internet Explorer 8 to render in the most recent mode. For instance; currently this would behave like using a value of IE=8, but when IE 9 is available that will be the mode that IE=edge will render in.

So based on the IE rendering modes i have changed my SharePoint master page compatibility,

it was before
<meta http-equiv=”X-UA-Compatible” content=”IE=EmulateIE8″ />

after
<meta http-equiv=”X-UA-Compatible” content=”IE=edge” />

Now, its rendering the perfect design with fully support of CSS3 styles. :)

How to move Add new item link to top location in SharePoint 2010

Recently my client request to me for moving “Add new Item” link to top location instead of bottom of every web part. Actually for adding new item user first click on tab (in ribbon bar) and then click on New Item button. Which is taking time and not a very good practice.

Secondly, if there are many items are saved in list or library then user have to scroll down and then click on Add new item link. That is also tedious.

Solution:
We will use jQuery for moving Add new item link from bottom to top location, for this we generically add the following script in master page. It will move all the Add new item links to top of each web part at run time in browser.

<script src=”http://ajax.googleapis.com/ajax/libs/jquery/1.4.2/jquery.min.js type=”text/javascript”></script>
<script language=”javascript” type=“text/javascript”>

$(document).ready(function () {

$(“td.ms-addnew“).parent().parent().parent().each(function () {
$(this).insertBefore($(this).prev());
});

});

</script>

You can also add this script to CEWP on page and the result will be same but on specified page.

Solve copy paste not working in Remote Desktop

The clipboard sharing is handled using a small application running on the remote machine, called “RDPCLIP.EXE”. If this application fails to do the job, your clipboard sharing will stop working and you will not be able to copy paste text, data or files from local computer to remote server using remote desktop connection.

How to solve this issue.

  1. Login to remote computer using Remote Desktop (RDP)
  2. Load up task manager (right click taskbar and select Start Task Manager)
  3. Go to the Processes Tab
  4. Select rdpclip.exe
  5. Click End Process
  6. Go to the Application Tab
  7. Click New Task
  8. Type rdpclip
  9. Click OK

There, copy and paste should now work normally again.

SharePoint 2010 Modal Dialog Pop up

Modal Dialogs in SharePoint 2010 use the client library SP.UI.ModalDialog and ShowPopupDialog. We can open Dialog without leaving the page by writing simple html markup and by calling some SP.UI.ModalDialog API’s.

Most simplest and an easy way to create SharePoint Modal Dialog is, calling JavaScript function and pass only URL parameter.

<a href=”javascript:SP.UI.ModalDialog.ShowPopupDialog(‘/_layouts/viewlsts.aspx?isDlg=1’);” >
View All Contents
</a>

isDlg=1 Optional
You can simply add “&IsDlg=1″ to any SharePoint URL and the chrome will be turned off.

There are some parameters specially setting the width and the height of the window and a null parameter for call back function. which for now is set to null. We can create Dialog with specified hight and width like,
<a href=”javascript:SP.UI.ModalDialog.ShowPopupDialog(‘/_layouts/viewlsts.aspx?isDlg=1’, null, 500, 300);” >
View All Contents
</a>

If we want to open Dialog and on closing of it’s a message will be display for the task completion etc. Now we are using SP.UI.Notify.addNotification API’s for message or notification display on screen.

<script type=”text/javascript” >
      function Callback(result, target) {

      if (result == SP.UI.DialogResult.cancel) {
            SP.UI.Notify.addNotification(“Operation was cancelled…”, false, “”, null);
      }
     else {
           SP.UI.Notify.addNotification(“Operation was cancelled…”, false, “”, null);
            //window.location.reload();
     }
     }
</script >

<a href=”javascript:SP.UI.ModalDialog.OpenPopUpPage(‘/_layouts/viewlsts.aspx’, Callback, 500, 300);“>
View All Contents
</a >

We can write our custom javascript and call SP.UI.ModalDialog function with Dialog setting with different options. Complete list of options can be found here

<script type=”text/javascript”>
function OpenDialog(URL) {
     var options = SP.UI.$create_DialogOptions();
     options.url = URL;
     options.width = 600;
     options.height = 400;
     SP.UI.ModalDialog.showModalDialog(options);
}
</script>

<a href=”javascript:OpenDialog(‘/_layouts/viewlsts.aspx’)”>Link</a>

Create List in Sharepoint 2010 Programmatically

There are two ways in creating custom list programmatically

  • Create the list by using the SharePoint Object Model
  • Create the list using an Existing list template

Creating a List programmatically by using the Object Model            

using (SPSite siteCollection = new SPSite(SPContext.Current.Site.Url.ToString()))
{
using (SPWeb spWeb = siteCollection.OpenWeb())
{
spWeb.AllowUnsafeUpdates = true;

spWeb.Lists.Add(“ListName”, “List Discription”, SPListTemplateType.PictureLibrary);

//You can change list template type (SPListTemplateType) ” Tasks, Calendar, Document Library etc.” as per your requirements, all OOTB list templates are listed here

 
spWeb.Update();
spWeb.AllowUnsafeUpdates = false;
}
}

Creating a List programmatically with Custom List Template Types

using (SPSite siteCollection = new SPSite(SPContext.Current.Site.Url.ToString()))
{
using (SPWeb spWeb = siteCollection.OpenWeb())
{
spWeb.AllowUnsafeUpdates = true;

//Get the list template from custom lists created on the SPWeb

SPListTemplate listTemplates = spWeb.ListTemplates[“your list template“];

spWeb.Lists.Add((“ListName”, “List Discription”, listTemplates);

spWeb.Update();
spWeb.AllowUnsafeUpdates = false;
}
}

SharePoint 2010 SPListTemplateType object

List Template Types available in the SharePoint SPListTemplateType object

Out of the box list templates

Name                                            BaseType                                  
Events GenericList
Contacts GenericList
Tasks GenericList
PictureLibrary DocumentLibrary
DiscussionBoard GenericList
Survey Survey
DocumentLibrary DocumentLibrary
Links GenericList
Document Library DocumentLibrary
Announcements GenericList
GenericList GenericList
WorkflowHistory GenericList
DataConnectionLibrary DocumentLibrary
DataSources DocumentLibrary
GanttTasks GenericList
CustomGrid GenericList
NoCodeWorkflows DocumentLibrary
XMLForm DocumentLibrary
WebPageLibrary DocumentLibrary
WorkflowProcess GenericList
Form Library DocumentLibrary
wiki DocumentLibrary
Wiki Page Library DocumentLibrary
Picture Library DocumentLibrary
Picture DocumentLibrary
Contacts GenericList
Calendar GenericList
Discussion Board GenericList
Project Tasks GenericList
Issue Tracking Issue
Custom List GenericList
Custom List in Datasheet View GenericList
Survey Survey
Custom Workflow Process GenericList
Languages and Translators GenericList
Translation Management Library DocumentLibrary
DataSources DocumentLibrary
Data Connection Library DocumentLibrary
Workflow History GenericList
No Code Workflows DocumentLibrary

Sharepoint 2010, Powershell and Disposing

PowerShell will automatically dispose of objects used in certain types of commands – e.g., those that appear on a single line or as part of a piped command, but you will need to manually dispose of objects for commands where you are instantiating a variable using Get-SPSite or Get-SPWeb. For example, PowerShell will automatically handle object disposal for the following command:

Get-SPWebApplication | Get-SPSite -limit all | ForEach-Object { write-host $_.Url  }

But, as the command below creates a variable called $web based on the SPWeb object, this will require disposal by specifying the $web.dispose() command after it has been used:

$web = Get-SPWeb http://portal
#PowerShell script goes here
#Now dispose of SPWeb object
$web.dispose()

Now, for all you IT Pro’s out there, this alone may scare you into never using PowerShell to manage SharePoint again (and I wouldn’t blame you). However, help is at hand with the Start-SPAssignment and Stop-SPAssignment cmdlets introduced in SharePoint 2010. To overcome the hassle of having to know when to dispose of an object and when not to, all you need to do is sandwich your script in between the following commands:

Start-SPAssignment –Global

#PowerShell script goes here

Stop-SPAssignment –Global

Any objects defined between the Start-SPAssignment –Global and Stop-SPAssignment –Global commands will be automatically disposed of by PowerShell as it will now know when the script has finished running. So, even if you are not sure whether objects should be disposed of or not, as long as you always top and tail your script with these cmdlets, you can’t go wrong.

No Assignment
The object is not assigned to a variable and is disposed after each iteration of the command.

1
2
Get-SPWeb http://server/sites/* |
     foreach { $_.Title | out-host }

Simple Assignment
All objects are assigned to the global assignment store. This is done by using the Global parameter. When using this level, all objects are assigned to a global store and are disposed of when the Stop-SPAssignment command is called.

1
2
3
4
5
6
Start-SPAssignment -GlobalGlobal
$web = Get-SPWeb "http://server/sites/web"
$web.Title = "Greetings from PowerShell"
$web.Update()
Stop-SPAssignment -Global
# $web will be disposed

Note: Use global assignment with caution! For example, if you use Start-SPAssignment – Global with and then call Get-SPSite –Limit ALL, every site collection object will be loaded, every site collection object will be loaded into memory. In a live server farm, this is likely to cause to cause serious performance issues

Advanced Assignment
Objects are assigned to named stores for disposal. You can dispose of objects by using the -Identity parameter with the Stop-SPAssignment command.

1
2
3
4
5
6
7
8
9
10
$siteScope = Start-SPAssignment
foreach($site in ($siteScope | Get-SPSite "http://server/*"))
{
   $webScope = Start-SPAssignment
   $web = $webScope | Get-SPWeb $site.RootWeb.Url
   $web.Title = "Greetings from PowerShell"
   $web.Update()
   Stop-SPAssignment $webScope
}
Stop-SPAssignment $siteScope

Regardless of the level used, all objects are disposed of when the PowerShell runspace is closed.